电子宠物-Pwnagotchi 制作记录

Coast23

简介

Pwnagotchi 是一款开源的电子宠物, 利用 Bettercap 捕捉 WiFi 包 (实际上我们只想要握手包, 用于破解 WPA2 密码), 并以 .pcap 格式保存.

最大的亮点当然是 可爱的 UI 啦.

它长这样: 👇

0.jpg

想了解更多? 请访问:

这里我使用的不是官方版本 (evilsocket’s ver.), 而是 jayofelony’s ver., 前者已经好几年没更新了.

以下是我的制作过程.


材料清单

硬件

名称来源价格(元)
pi zero 2W + 32G SD卡小黄鱼105
微雪2.13寸墨水屏 (V4)某宝74
UPS-Lite v1.3小黄鱼33
USB - Micro USB 线不知哪里摸出来的0

软件

名称描述
Pwnagotchi系统镜像, 建议用 gh-proxy.com 加速下载
RPi Imager用于烧录镜像
RNDIS DriverRNDIS 的驱动

安装步骤

烧录系统

跟着 wiki 做就行了.

下载镜像, 并使用 RPi Imager 烧录到 SD 卡.

RPi Device操作系统储存卡Next
pi zero 2WUse custom->下载的系统镜像SD卡不要使用自定义配置!

把 SD 卡插到板子上, 如图组装好电脑, 用 USB - Micro USB 线连接电脑.

注意, 必须接到板子中间的 Micro USB 接口上, 最旁边的接口不支持数据传输.

开启网络共享

电脑下载并安装 RNDIS 驱动. 安装方式: 解压出两个文件, 右键 RNDIS.inf, 选择 安装.

然后, 在 控制面板 -> 网络和 Internet -> 网络连接 (可在启动菜单搜索) 找到这个 USB Ethernet/RNDIS Gadget 适配器, 右键选择 属性.

按照下图进行设置:

1.png

2.png

3.png

然后, 可以 ping 10.0.0.1, 能 ping 通说明设置成功.

下载 该脚本, 并在 PowerShell 中运行:

.\win_connection_share.ps1 -EnableInternetConnectionSharing

4.png

第一个选择电脑的网卡适配器, 第二个选择 RNDIS 适配器.

设置好后, 就可以 SSH 连接板子了.

SSH 完成基础配置

使用系统自带的 SSH 连接板子.

当然, 用 PuTTY, FinalShell, XShell 等工具也行.

用户名是 pi, 密码是 raspberry.

ssh pi@10.0.0.2
# 如果问是否保存 fingerprint, 输入 yes
# 然后输入密码 raspberry

然后再输入 sudo pwnagotchi --wizard, 根据提示一步步配置.

参考配置:

pi@pwnagotchi:~ $ sudo pwnagotchi --wizard
Do you want to restore the previous configuration?

[Y/N]: N
This will create a new configuration file and overwrite your current backup, are you sure?

[Y/N]: Y
Welcome to the interactive installation of your personal Pwnagotchi configuration!
My name is Jayofelony, how may I call you?


Pwnagotchi name (no spaces): CoCoPwny
I shall go by CoCoPwny from now on!
How many networks do you want to whitelist? We will also ask a MAC for each network?
Each SSID and BSSID count as 1 network.

Be sure to use digits as your answer.

Amount of networks: 0
Do you want to enable BT-Tether? # 也可以选择 N, 后面再配置 BT-Tethering.

[Y/N] Y
What name uses your phone, check settings?

phone
What device do you use? android or ios?

Device: android
What is the bluetooth MAC of your device?

MAC: <手机蓝牙 MAC>
Do you want to enable a display?

[Y/N]: Y
What display do you use?

Be sure to check for the correct display type @
https://github.com/jayofelony/pwnagotchi/blob/master/pwnagotchi/utils.py#L240-L501

Display type: waveshare_4 # 根据你的显示屏型号, 以及链接代码列出的显示屏型号来输入.
Do you want to invert the display colors?
N = Black background
Y = White background

[Y/N]: Y
pi@pwnagotchi:~ $

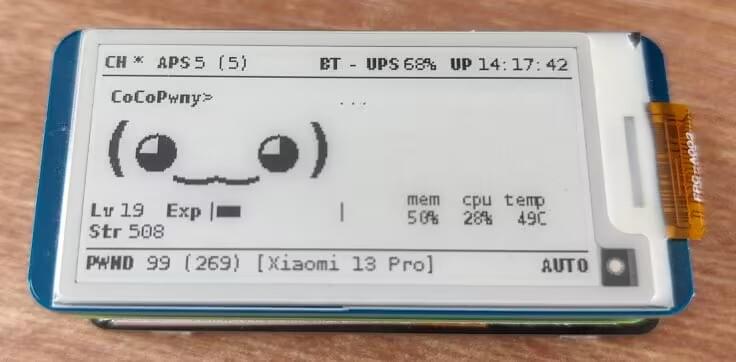
不出意外的话, 就能在显示屏上看到可爱的电子宠物了.

浏览器访问 10.0.0.2:8080, 点击右下角的 Restart in AUTO mode, Pwnagotchi 就开始抓包啦~
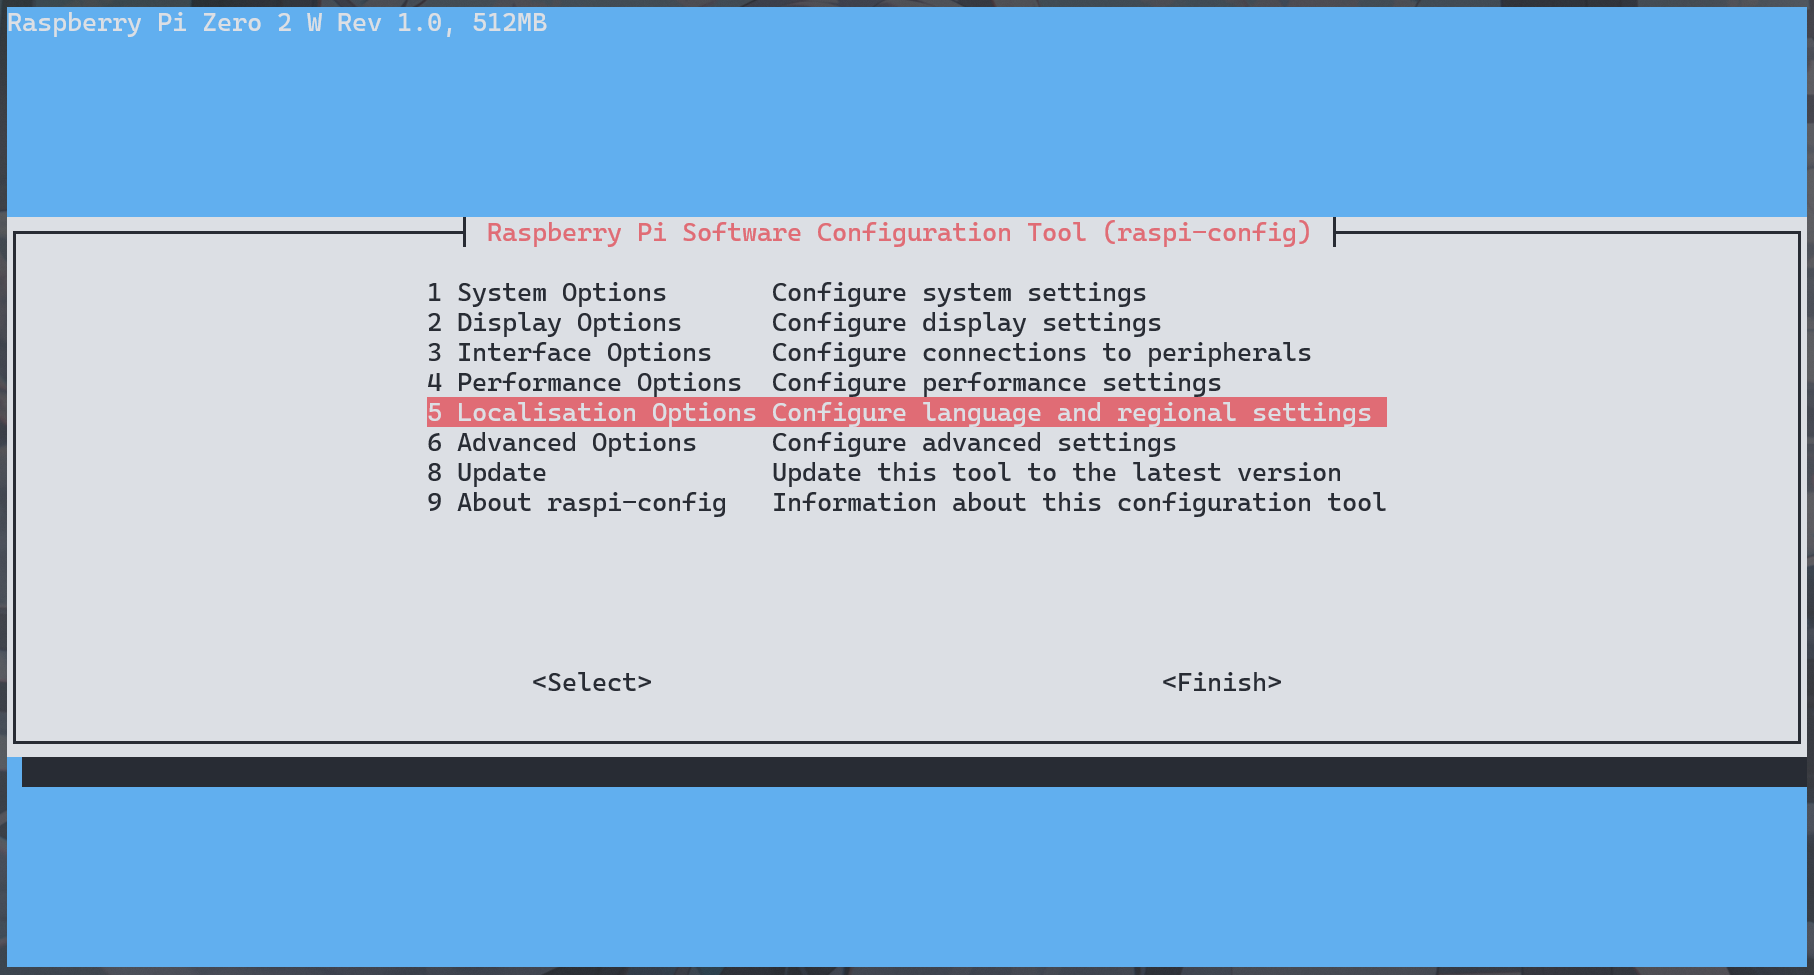
时区设置

我没有安装 RTC 模块, 所以板子断电后显示的时间就不准了.

但在终端输入 timedatectl status 后:

pi@CoCoPwny:~ $ timedatectl
Local time: Sat 2025-04-12 13:40:05 BST
Universal time: Sat 2025-04-12 12:40:05 UTC
RTC time: n/a
Time zone: Europe/London (BST, +0100)
System clock synchronized: yes
NTP service: active
RTC in local TZ: no

可以发现, NTP 服务是开启的, 也就是说, 板子会自动同步互联网时间.

接下来只需要修改时区就可以了.

sudo raspi-config

5.png

后面不需要我多说了, 改成 Asia - Shanghai 就行.


插件使用

较全的插件库: https://github.com/itsdarklikehell/pwnagotchi-plugins

我安装的插件有:

插件描述备注
expv2没啥用
aircrackonly会自动删除非握手包和非 PMKID.缺点: 无法判断握手包是否是 WPA3.
BT-Tethering通过手机蓝牙共享网络可以取代屏幕
wpa-sec自动将握手包上传到 wpa-sec.stanev.org 进行破解需要先在 /etc/pwnagotchi/config.toml 填写 api_key, 然后在 web-ui 的插件列表里启用
memtemp显示内存占用, CPU 占用, 以及温度信息有 plus 版, 但我没用过.
logtail可以在 web-ui 中查看日志了
ups_lite显示 ups-lite v1.3 的电量信息官方版本有 bugs, 我另外自己修改了一下

安装配置插件后, 需要重启 Pwnagotchi 才能生效.

下面是各个插件的安装使用方法.

expv2 (⭐)

  • 功能简介: 显示 level, experience, strength 信息. (没啥用)

代码 扔到 /usr/local/share/pwnagotchi/custom-plugins/.

把以下配置信息添加到 /etc/pwnagotchi/config.toml:

(如果屏幕不是 2.13 寸, 可能得自己调整坐标.)

main.plugins.expv2.lvl_x_coord = 0
main.plugins.expv2.lvl_y_coord = 82
main.plugins.expv2.exp_x_coord = 38
main.plugins.expv2.exp_y_coord = 82
main.plugins.expv2.str_x_coord = 0
main.plugins.expv2.str_y_coord = 93
main.plugins.expv2.bar_symbols_count = 12

效果: 图略

aircrackonly (⭐⭐)

功能: 自动删除非握手包和非 PMKID.

使用官方插件库里的代码 aircrackonly.py

或者我自己魔改的代码 (仍然有问题, 可能还是自己写一个移除非握手包的脚本.):

展开代码
"""
Modified from https://github.com/evilsocket/pwnagotchi-plugins-contrib/blob/master/aircrackonly.py
"""
import pwnagotchi.plugins as plugins

import logging
import subprocess
import string
import os, uuid
from pathlib import Path
'''
Aircrack-ng needed, to install:
> apt-get install aircrack-ng
'''


class AircrackOnly(plugins.Plugin):
__author__ = 'pwnagotchi [at] Coast23 [dot] cn'
__version__ = '1.0.2'
__license__ = 'GPL3'
__description__ = 'Remove uncrackable pcap files'

def __init__(self):
self.text_to_set = ""

def on_loaded(self):
logging.info("aircrackonly plugin loaded")

if 'face' not in self.options:
self.options['face'] = '(>.<)'

check = subprocess.run(
('/usr/bin/dpkg -l aircrack-ng | grep aircrack-ng | awk \'{print $2, $3}\''), shell=True, stdout=subprocess.PIPE)
check = check.stdout.decode('utf-8').strip()
if check != "aircrack-ng <none>":
logging.info("aircrackonly: Found " + check)
else:
logging.warning("aircrack-ng is not installed!")

def on_handshake(self, agent, filename, access_point, client_station):
"""
作了较大改动.
I make some changes here.
"""
display = agent._view

keepfile = False

logging.info("[AircrackOnly] Checking " + filename)

try:
dictpath = Path(f"/tmp/{uuid.uuid4()}")

with open(dictpath, "w") as f:
f.write("114514") # Pick a random unvalid password.

result = subprocess.run(
f'/usr/bin/aircrack-ng "{filename}" -w "{dictpath}"',
shell = True,
stdout = subprocess.PIPE,
stderr = subprocess.PIPE,
timeout = 3
)

os.remove(dictpath)

if "KEY NOT FOUND" not in result.stdout.decode('utf-8'):
keepfile = False

else:
logging.info(f"[AircrackOnly] {filename} is crackable.")
keepfile = True

except subprocess.TimeoutExpired:
"""
超时, 说明文件存在多个包, 改为判断是否含有握手包或 PMKID.
Timeout means there are multiple packages, we need to check if it contains a handshake or PMKID.
(其实只是我不会写交互)
To be honest, I don't know how to interact with subprocess.Popen :(
"""
logging.info(f"[AircrackOnly] Timeout while checking {filename}.")
if os.path.exists(dictpath): os.remove(dictpath)

proc = subprocess.Popen(
["/usr/bin/aircrack-ng", filename],
stdout=subprocess.PIPE,
stderr=subprocess.PIPE,
bufsize=1,
text=True,
)

try:
stdout, stderr = proc.communicate(timeout=5)

if "1 handshake" in stdout:

keepfile = True
logging.info(f"[AircrackOnly] {filename} contains a handshake.")

if "PMKID" in stdout:

keepfile = True
logging.info(f"[AircrackOnly] {filename} contains PMKIDs.")


except subprocess.TimeoutExpired: keepfile = False
finally: proc.terminate()

if keepfile:
logging.info(f"[AircrackOnly] {filename} is kept.")

else:
self.text_to_set = "Removed an uncrackable pcap"
display.update(force=True)

logging.warning(f"[AircrackOnly] {filename} is descarded.")
os.remove(filename)

def on_ui_update(self, ui):
if self.text_to_set:
ui.set('face', self.options['face'])
ui.set('status', self.text_to_set)
self.text_to_set = ""

把代码扔到 /usr/local/share/pwnagotchi/custom-plugins/.

编辑 /etc/pwnagotchi/config.toml, 添加:

main.plugins.aircrackonly.enabled = true

然后重启 Pwnagotchi.

官方代码有 bugs , 我自己魔改的版本慎用.

BT-Tethering (⭐⭐⭐)

功能: 通过蓝牙共享网络, 用手机就能访问 web-ui. (以及用 termux 进行 SSH.)

缺点: 似乎不支持断连后重连, 有空再看看怎么修.

开启手机蓝牙网络共享

不同手机方法可能不一样, 我这里是 连接与共享 -> 个人热点 -> 蓝牙网络共享.

获取手机蓝牙 MAC

不同手机方法可能不一样, 我这里是 关于本机 -> 状态信息 -> 蓝牙地址.

配置 BT-Tethering

参考自 wiki.

开启手机蓝牙, 电脑 SSH 连接板子, 进行如下操作:

sudo bluetoothctl
scan on # 扫描周围蓝牙设备

# 等到你的手机出现在列表中

pair <手机蓝牙 MAC> # 配对
trust <手机蓝牙 MAC> # 信任

然后, 编辑 /etc/pwnagotchi/config.toml, 找到和 main.plugins.bt-tether 有关的部分, 修改为:

main.plugins.bt-tether.enabled = true
main.plugins.bt-tether.phone-name = "" # 手机名称, 填热点里显示的名称就行
main.plugins.bt-tether.phone = "" # android / ios
main.plugins.bt-tether.mac = "" # 手机蓝牙 MAC
main.plugins.bt-tether.ip = "" # android 在 192.168.44.2-254 里挑一个, ios 在 172.20.10.2-254 里挑一个. 我设置的是 192.168.44.44

保存, 重启 Pwnagotchi. (用 web-ui 或命令 pwnkill)

然后, 如果看到手机蓝牙连上了板子, 且显示 已连接, 用于互联网连接共享, 就可以在手机上用 192.168.44.44 访问板子了.

wpa-sec (⭐⭐⭐)

功能: 自动把抓到的握手包上传到 wpa-sec.stanev.org 进行破解.

效果图:

6.png

注册 wpa-sec.stanev.org

wpa-sec.stanev.org, 输入邮箱, 得到一个 key.

编辑 /etc/pwnagotchi/config.toml, 找到 main.plugins.wpa-sec 的部分, 修改为:

main.plugins.wpa-sec.enabled = true
main.plugins.wpa-sec.api_key = "" # 你的 key

然后重启 Pwnagotchi.

memtemp (⭐⭐)

在 web-ui 的插件列表中启用即可.

logtail (⭐⭐⭐)

在 web-ui 的插件列表中启用即可.

ups_lite (⭐⭐⭐)

在 web-ui 的插件列表中启用, 但这个官方插件有 bugs. 比如显示总是显示 0-, 而且没有任何日志.

可以使用我的修改版:

展开代码
# Based on: https://github.com/PhreakBoutique/UPSLite_Plugin_1_3/blob/main/upslite_plugin_1_3.py
# Reference: https://github.com/linshuqin329/UPS-Lite/blob/master/UPS-Lite_V1.3_CW2015/UPS_Lite_V1.3_CW2015.py
# Note: This script has not been fully tested and may only work correctly on my setup.
# Only applys to UPS Lite v1.3.

import logging
import os
import struct
import time

import RPi.GPIO as GPIO

import pwnagotchi
import pwnagotchi.plugins as plugins
import pwnagotchi.ui.fonts as fonts
from pwnagotchi.ui.components import LabeledValue
from pwnagotchi.ui.view import BLACK

CW2015_ADDRESS = 0x62
CW2015_REG_VCELL = 0x02
CW2015_REG_SOC = 0x04
CW2015_REG_MODE = 0x0A

CHARGING_GPIO_PIN = 4

INTERVAL = 30 # The interval to retry initialization if UPS object is None (in seconds)


class UPS:
def __init__(self):
# Check if I2C is enabled
if not os.path.exists("/dev/i2c-1"):
raise RuntimeError("I2C device not found")


# Initialize GPIO once using BCM pin numbering
GPIO.setmode(GPIO.BCM)
GPIO.setwarnings(False)
GPIO.setup(CHARGING_GPIO_PIN, GPIO.IN)

import smbus
self._bus = smbus.SMBus(1)
self._bus.write_word_data(CW2015_ADDRESS, CW2015_REG_MODE, 0x30)

def voltage(self):
try:
read = self._bus.read_word_data(CW2015_ADDRESS, CW2015_REG_VCELL)
swapped = struct.unpack("<H", struct.pack(">H", read))[0]
# return swapped * 1.25 / 1000 / 16
return swapped * 0.305 / 1000 # From linshuqin329's script. Seems to be the correct one.
except Exception as e:
logging.error("[ups-lite] Voltage read error: %s", e)
return 0.0

def capacity(self):
try:
read = self._bus.read_word_data(CW2015_ADDRESS, CW2015_REG_SOC)
swapped = struct.unpack("<H", struct.pack(">H", read))[0]
return swapped / 256
except Exception as e:
logging.error("[ups-lite] Capacity read error: %s", e)
return 0.0

def charging(self):
try:
return '+' if GPIO.input(CHARGING_GPIO_PIN) == GPIO.HIGH else '-'
except Exception as e:
logging.error("[ups-lite] Charging status error: %s", e)
return '-'

def cleanup(self):
# Clean up only the pin used by this plugin
GPIO.cleanup(CHARGING_GPIO_PIN)


class UPSLite(plugins.Plugin):
__author__ = 'Coast23'
__version__ = '1.0.1'
__license__ = 'GPL3'
__description__ = 'A plugin that will add a voltage indicator for the UPS Lite v1.3. Bugs fixed by Coast23.'

def __init__(self):
self.ups = None
self.last = 0
self.interval = INTERVAL

def get_ups(self):
try:
self.ups = UPS()
logging.info("[ups-lite] UPS initialized successfully.")
except Exception as e:
logging.warning("[ups-lite] Failed to initialize UPS.")
self.ups = None
self.last = time.time()

def on_loaded(self):
self.get_ups()

def on_ui_setup(self, ui):
ui.add_element('ups', LabeledValue(color=BLACK, label='UPS', value='0%', position=(ui.width() / 2 + 15, 0),
label_font=fonts.Bold, text_font=fonts.Medium))

def on_unload(self, ui):
with ui._lock:
ui.remove_element('ups')
if self.ups:
self.ups.cleanup()
logging.info("[ups-lite] UPS plugin unloaded and GPIO cleaned.")

def on_ui_update(self, ui):
now = time.time()
# Retry initialization if UPS object is None
if self.ups is None and now - self.last >= self.interval:
self.get_ups()

if self.ups:
capacity = self.ups.capacity()
charging = self.ups.charging()
ui.set('ups', "%2i%s" % (capacity, charging))
else:
ui.set('ups', "???")

注意, v1.1, v1.2v1.3 的 ups-lite 不一样, 这里的插件只适用于 v1.3.


待解决的问题

  • BT-Tethering 断连后无法重连
  • AircrackOnly 插件有时似乎不工作
  • ups-lite 有时还是错误地显示 0%
  • 中文 WiFi 名 会显示成 (字体问题)
  • SSID添加白名单似乎不起作用
  • 从手机获取 GPS 信息.
  • 加一个邪恶的功能: 不断发起 Deauth 攻击.
  • 标题: 电子宠物-Pwnagotchi 制作记录
  • 作者: Coast23
  • 创建于 : 2025-04-10 17:28:02
  • 更新于 : 2025-04-26 15:24:29
  • 链接: https://coast23.github.io/2025/04/10/电子宠物-Pwnagotchi-制作记录/
  • 版权声明: 本文章采用 CC BY-NC-SA 4.0 进行许可。
评论